

Dealing with Broken Exhaust Manifold Studs - Drilling, Removal, Extraction and Re-Threading
We have a few tricks up our sleeves to help deal with broken exhaust manifold studs, broken EZ Outs, drill bits, and re-threading stripped exhaust manifold threads in the cylinder head if needed. Here's about a 5-minute read that could save you a lot of time when dealing with these issues. After reading this article check out an article I wrote on this topic many years ago when I worked for CarMax called Dodge 4.7 Exhaust Noise on Cold Start Up - Dakota Ram Durango.
Okay, so if you're reading this, you may already be well aware that you have a broken exhaust manifold stud. But what are some of the signs that a stud could be a problem to begin with? When an exhaust manifold stud becomes loose or breaks, it can create a small gap between the exhaust manifold and the cylinder head, leading to an exhaust leak. This small gap can result in a ticking or tapping sound that is often more noticeable when the engine is first started and it's cold or during acceleration or when the engine is under load. The ticking noise is caused by the exhaust gases escaping through the gap and can sometimes mimic the sound of a ticking lifter or valve. An exhaust manifold leak may also trigger a lean code. An exhaust manifold leak can introduce additional air into the exhaust system upstream of the oxygen (O2) sensors. The O2 sensors measure the oxygen content in the exhaust gases to provide feedback to the ECM for fuel control. If excess air is drawn in through the leak, the O2 sensors may interpret it as a lean condition since the additional oxygen makes it appear as if the engine is running with less fuel. This can lead to a lean signal being sent to the ECM, which triggers a lean code: P0171 - System Too Lean (Bank 1) or P0174 - System Too Lean (Bank 2). Obviously if working on a 4 cylinder or straight 6, there will be no Bank 2. But if working on a V-6 or V-8 a lean code can be a clue. The fact that either Bank 1 or Bank 2 codes may appear can help point you in the right direction. Bank 1 is going to be on the side of the engine that the #1 cylinder is located. Check firing order for the engine you're working on if you need to find out which side the #1 cylinder is on and in turn Bank 1.
Question: How can I inspect exhaust manifold studs for problems?
Answer: Inspecting exhaust manifold studs for problems involves a visual examination, which means gaining access to see directly with your eyes or using an inspection camera to view the manifold. Depending on the orientation of the engine, sometimes there's a flap that's commonly known as a splash shield or a fender liner blocking a clear view. It is a flexible rubber or plastic panel that's typically located behind the tire, in the wheel well area of a vehicle. If that's in the way, it may need to be removed to gain access.
Here's how to inspect exhaust manifold studs for potential issues:
- Visually inspect the studs and manifold: Examine the visible portion of the exhaust manifold and studs. Look for any signs of damage, such as fractures, cracks, or corrosion on the manifold. A cracked manifold can sound the same as a broken or missing stud and cause lean codes as well. Pay particular attention to the area where the studs go through the manifold.
- Check for missing or loose studs or nuts: Ensure that all the exhaust manifold studs are present and securely fastened. If you notice any missing or loose studs, you've located at least one problem.
- Look for signs of leaks: Inspect the area around the studs for any signs of exhaust leaks. Look for black carbon deposits, soot, or discoloration around the stud or the mating surface between the manifold and the cylinder head. These can be indications of exhaust gases escaping from the manifold due to a broken or loose stud.
- Check how tight the nuts or bolts are: This involves using a tool, such as a wrench or socket, to gently attempt to tighten each stud. If a stud is loose or easily turns without resistance, it may be stripped or broken.
Exhaust manifold studs/bolts are made of hardened steel and are subjected to high temperatures, which can cause them to become corroded or seized over time. These thermal cycles also cause the studs to expand and contract repeatedly. The expansion and contraction of the exhaust manifold and the studs can lead to the development of stress and fatigue over time. This can weaken the bolts, making them more susceptible to breaking or shearing off. Additionally, the corrosion and heat exposure can make them more difficult to remove. Furthermore, the bolts may be located in tight spaces, making it harder to access them with drilling tools.
Question: Is it possible to weld a nut to the broken stud or bolt to help remove it? What could possibly go wrong?
Answer: Answer: It is possible to weld a nut to the broken stud or bolt as a method to assist in its removal. However, it's important to consider potential challenges that may arise during the process. While an experienced MIG welder can perform this method effectively, several factors could potentially cause issues. Heat damage to surrounding components is a concern, especially if proper precautions are not taken. Insufficient weld penetration may result in a weak connection, making it harder to remove the stud. In the event that the weld doesn't hold, drilling becomes more difficult.
Question: Are broken exhaust manifold bolts/studs hard to drill out?
Answer: Yes and no. Sometimes they are just broken, and the remainder of the broken piece can be unscrewed rather easily, depending on how much they protrude. The best-case scenario for a broken exhaust stud is that it sticks out enough to be grabbed with vice grips or a Turbo Socket, or can be spun out easily with a Left Hand Drill Bit. If it comes out easily, count yourself lucky! The more common scenario is that they don't turn easily. In that case, they can be very challenging to drill out. Several factors contribute to the difficulty, such as the material the bolts are made of, their size, and the accessibility of the broken bolts.
As mentioned before, exhaust manifold studs/bolts are subjected to high temperatures, which can cause them to become corroded or seized over time. This corrosion and heat exposure can make them more difficult to remove. It can effectively "weld" the bolt in place, making it extremely challenging to turn or remove. Additionally, the bolts may be located in tight spaces, making it harder to access them with drilling tools.
To drill out a broken exhaust manifold bolt, it's essential to use the right tools and techniques. Here are some general steps that can help in the process:
- Remove the exhaust manifold: If the remaining bolts or nuts don't come off easily, there are several steps and techniques you can try to increase your chances of success. Here are some things to try when encountering stubborn exhaust manifold studs or nuts:
- Penetrating oil: Apply a high-quality penetrating oil, such as WD-40 or PB Blaster, to the stud or nut and allow it to soak for a sufficient amount of time. The penetrating oil helps to loosen rust, corrosion, and seized components, making them easier to remove. Reapply the oil periodically to maximize its effectiveness.
- Heat application: Use a heat source, such as a propane or acetylene torch or induction tool, to apply heat directly to the stud or nut. The heat helps to expand the metal, breaking up corrosion and freeing the threads. Be cautious not to overheat surrounding components, as excessive heat can cause damage.
- Impact or vibration: Use an impact wrench or breaker bar with an impact socket to apply sudden, strong rotational force to the stud or nut. The impact or vibration can help break the bond between the threads and aid in loosening the fastener. Alternatively, tapping the fastener with a hammer or using a vibrating tool, like an air chisel with a flat bit may also help to break up corrosion and facilitate removal. It's best to try a breaker bar first, and then if it seems too tight, the impact method with sudden force back and forth often loosens the nut or stud.
- Combination of heat and penetrating oil: Combine heat application and penetrating oil by heating the stud or nut and then applying penetrating oil while it is still hot. The heat helps the oil penetrate deeper into the threads, enhancing its effectiveness in loosening the fastener.
After the exhaust manifold has been removed, it's time to get to work on removing the broken studs. Obviously, if they are sticking out, grabbing them with a pair of Vise Grips or using a Turbo socket is the first thing to try. If they are broken off flush or recessed somewhat, drilling is the next step. Prepare the area: Before attempting to drill out the broken bolt, make sure the surrounding area is clear and protected. Cover sensitive parts, such as nearby wiring, to prevent any damage from metal shavings or debris. This should go without saying, but wear your safety glasses before drilling.
- Apply more penetrating oil to the broken stud/bolt and let it sit for some time. This can help loosen the corrosion and make drilling easier.
-
Choose the right drill bit: Select a drill bit that matches the size of the broken bolt. It should be sharp and designed for drilling through hardened metal. Cobalt or titanium-coated drill bits are often recommended for their durability. However, be careful not to apply excessive force that can cause the bit to break.
- Center punch: Use a center punch to create an indentation at the center of the broken bolt. This will help the drill bit stay centered during drilling and prevent it from wandering off. I like the spring-loaded type of centering punches like the LS30280 because they are typically precise and easy to use. It's good to have several options, though, in case one works better than another in certain instances.
- Start with a small pilot hole: Begin drilling with a small-sized drill bit to create a pilot hole. This initial hole will guide the larger drill bits. As mentioned before, left-hand drill bits may spin the exhaust stud out easily if the stud is not seized. It's always nice to have some left-hand drill bits to use just in case it's your lucky day. If it's not, continue to the next step.
- Gradually increase drill bit size: Gradually increase the size of the drill bit, drilling successively larger holes until you reach the desired size. Take care not to apply excessive force or let the drill bit overheat, as it can break or damage the surrounding metal.
- Extract the bolt: Once you've drilled out the broken bolt, you can attempt to extract it using various methods, such as using an easy-out extractor, a bolt extractor tool, or carefully tapping it with a hammer and chisel to loosen it. It's a very common mistake to force an EZ Out and break it! I like the straight flute Double Edge type extractors because they don't go down further with applied force (like the spiral type), resulting in them wedging themselves in tighter and tighter until they either remove the stud or reach their breaking point. We sell a lot of Rescue Bits to guys that have broken an EZ-Out in the stud. Rescue Bits are great, but they are not 100% successful, and we offer no warranty or guarantee on the tool or the success of someone using them. In fact, all drill bits, extractors, etc., are considered consumable and have no warranty whatsoever. With that being said, many techs and machine shops swear by the Rescue Bit products. There are just not many options to drill out something as hard as an EZ-Out. Rescue Bits are made of Tungsten Carbide and are harder than EZ-Outs.
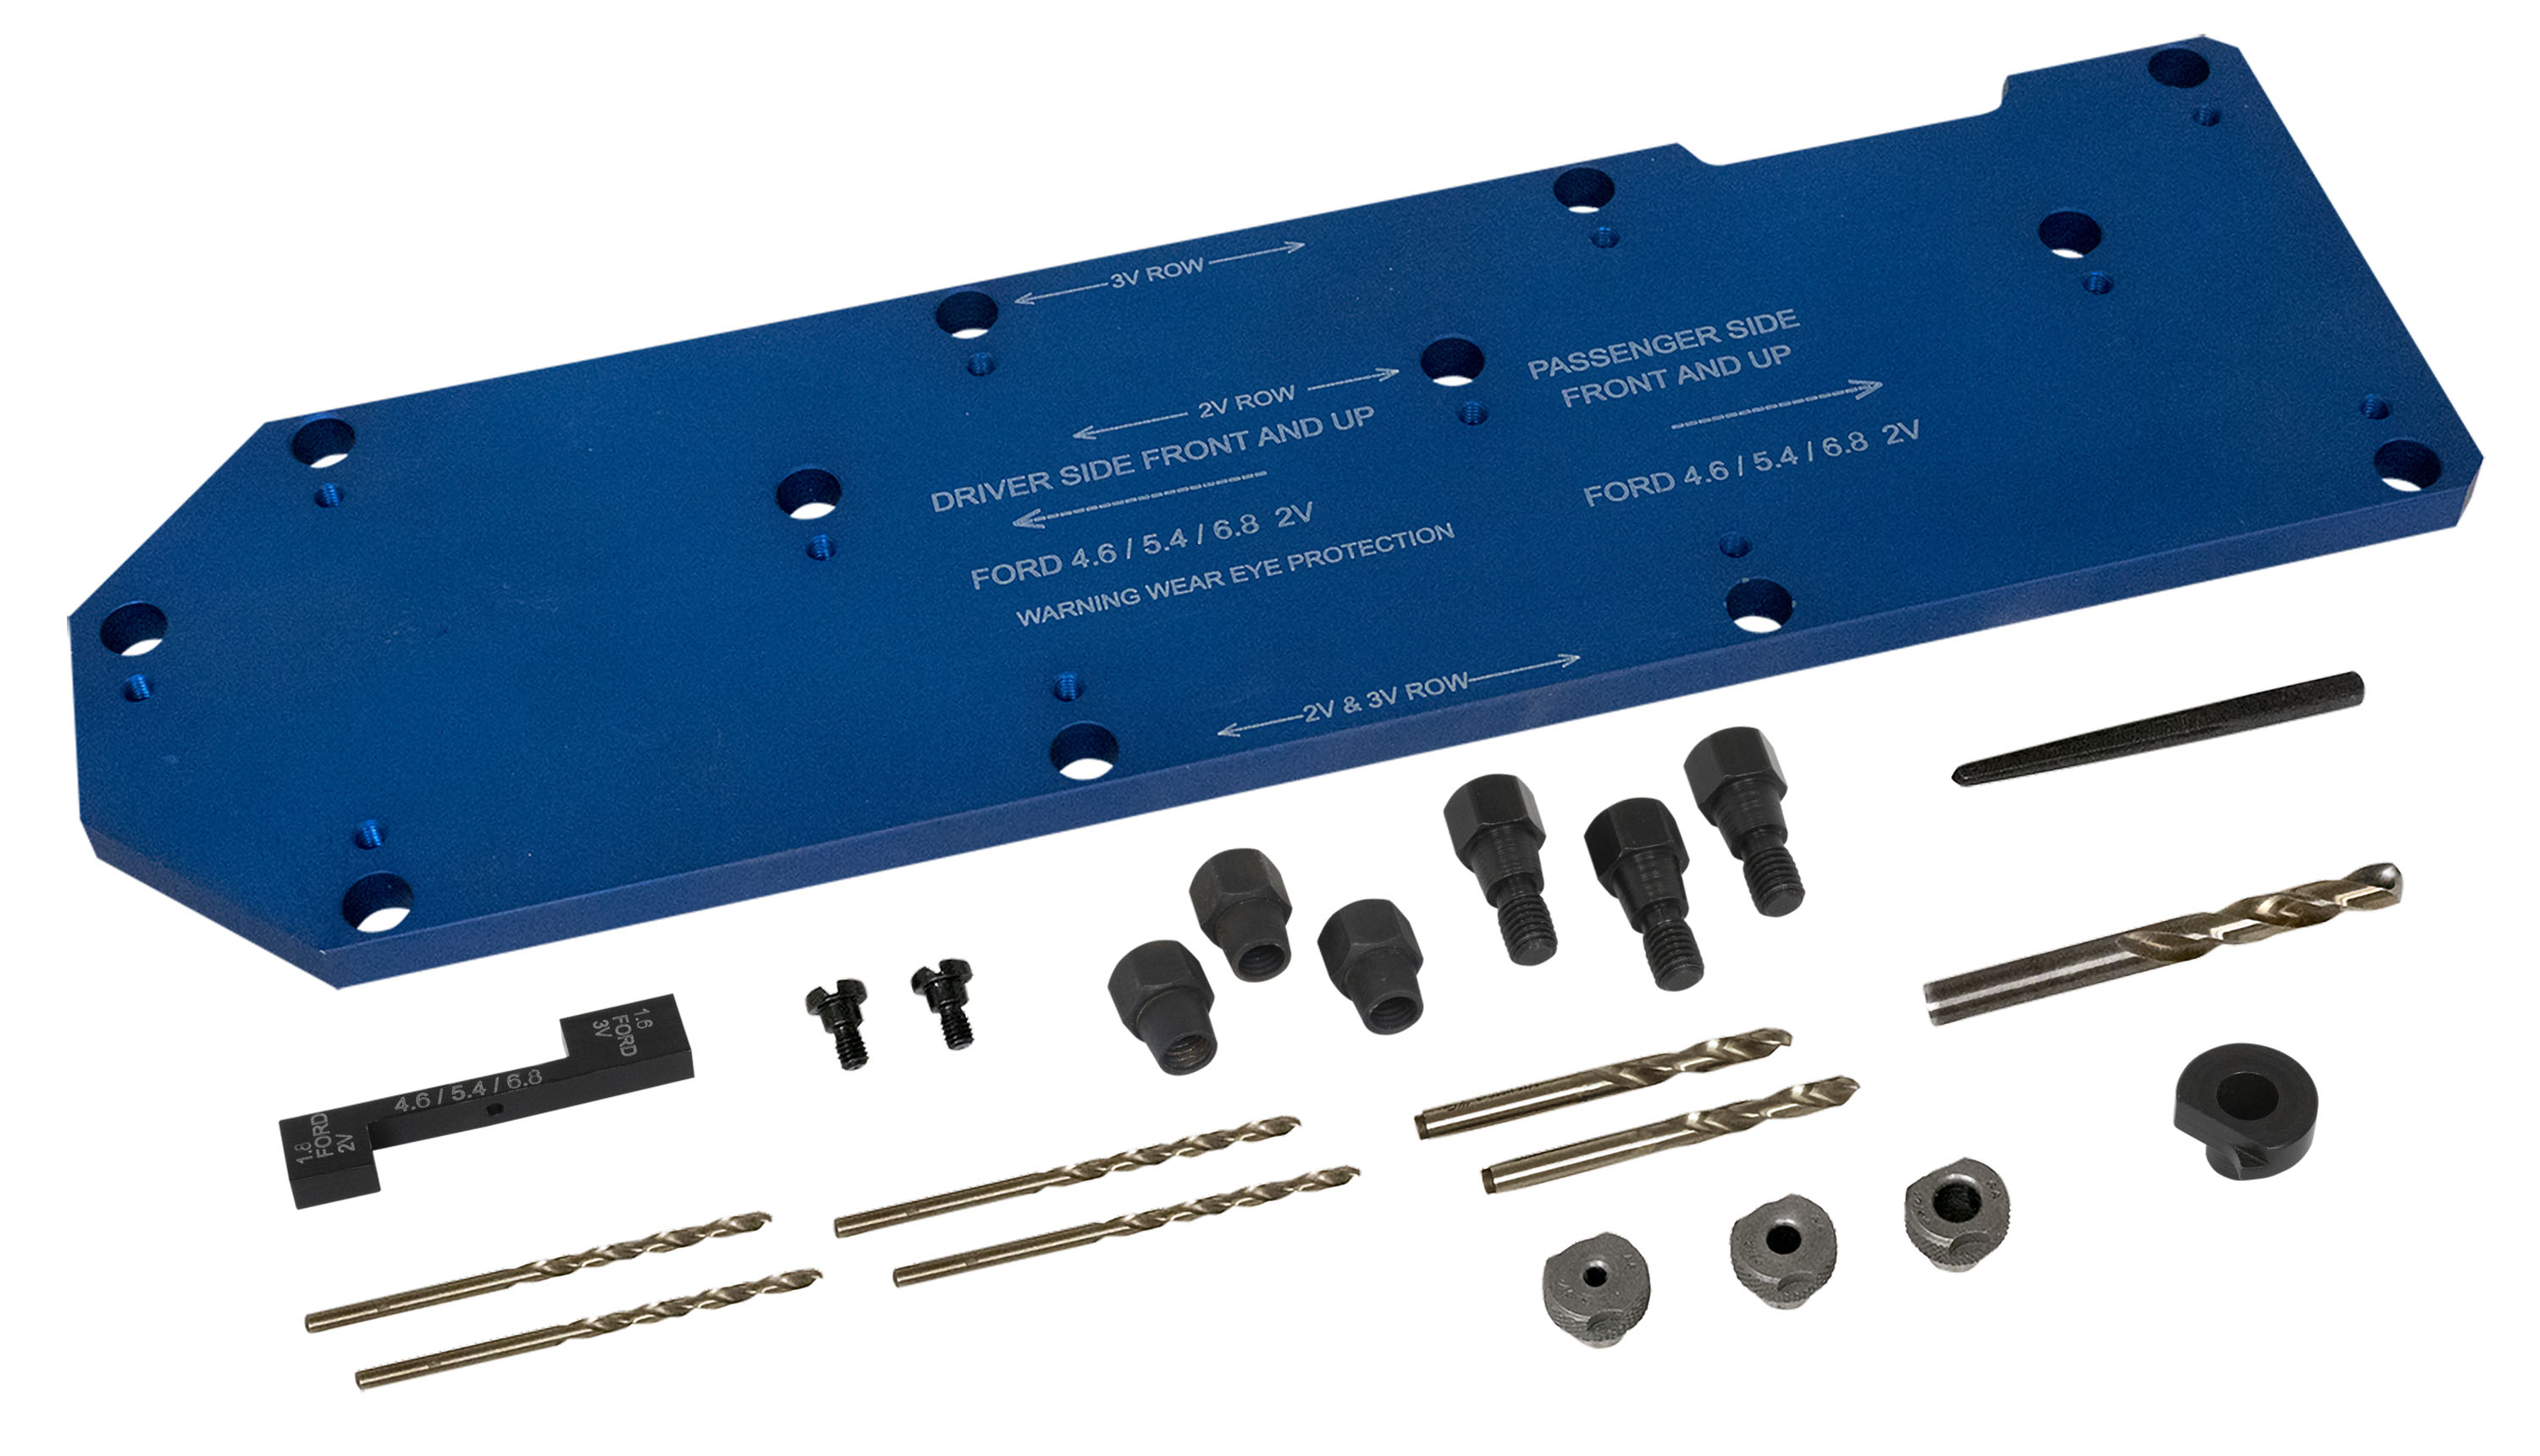
Question: Can a drilling guide be used to help drill broken exhaust manifold studs out easier?
Answer: Yes, using a template or a drilling guide can be helpful when drilling out broken exhaust manifold studs. A template or drilling guide is essentially a tool that helps ensure accurate drilling by providing a guide for the drill bit. See our website for more applications, here's a few of the most common ones:
Dodge, Jeep 4.7 Broken Exhaust Stud Removal Kit
Ford 4.6L/5.4L Exhaust Manifold Stud/Bolt Drill Guide
It's important to note that a drilling guide cannot be used with a Rescue Bit. Rescue Bits require a rounding motion to be used when drilling. For that reason, a drill press or a drilling guide cannot be used because those would prevent the rounding motion from being made.If most of the stud is drilled out, a thread chaser can be a useful tool for cleaning up the remaining threads in the cylinder head. A thread chaser is specifically designed to restore damaged or corroded threads without removing any additional material.
Here's how you can use a thread chaser in this scenario:
- Get a thread chaser that matches the thread size and pitch of the original stud. It should have the same specifications as the existing threads in the cylinder head.
- Apply a suitable lubricant or cutting oil to the remaining threads in the cylinder head. This helps facilitate the thread chaser's movement and reduces friction during the cleaning process.
- Insert the thread chaser into the remaining threads of the head. Ensure that it aligns properly and engages with the existing threads.
- Rotate the thread chaser: While applying gentle pressure, rotate the thread chaser in a clockwise direction. The cutting edges of the thread chaser will remove debris, corrosion, or damaged material from the threads.
- Clean the threads: After several rotations, remove the thread chaser and clean the threads using a brush or compressed air to remove any loose debris or metal shavings. Inspect the threads to ensure they are clean and free of obstructions.
- Verify the fit: Once the threads are cleaned, test the fit of a new stud or bolt to ensure it threads in smoothly and securely. If any resistance or difficulty is encountered, repeat the thread cleaning process with the chaser until the threads are properly cleaned and aligned.
Using a thread chaser can help restore the threads in the cylinder head for the exhaust manifold and allow for the installation of a new stud or bolt. However, it's important to know that the effectiveness of thread chasing depends on the extent of damage and the condition of the remaining threads. In cases of severe damage or excessive material removal, alternative repair methods such as a TIME-SERT thread repair kit, which installs a solid bushing-type insert, may be required.
Here's a general outline of the process to use a TIME-SERT thread repair kit for repairing the threads:
Select the appropriate size kit: Choose a TIME-SERT thread repair kit that matches the size and thread pitch of the original hole in the cylinder head. The kit will include the necessary components, such as a drill bit, tap, installation tool, and inserts. You'll basically drill, tap and then screw in the insert. Then use the installation driver to finish and expand the bottom threads. If the hole has been enlarged too much during the removal process, a Big Sert kit (which is TIME-SERT's name for oversize) may be needed. It still accepts the original size bolt or stud but uses thicker inserts. You can find more articles on the use of TIME-SERT kits on our blog if you're unfamiliar with them and want to learn more.
For over 15 years, Wise Auto Tools' commitment has been to offer our readers and hopefully customers with car repair articles and supply specialty tools to help them complete their projects. Remember to save our website as a favorite and consider us for your upcoming automotive tool needs.
Recent Posts
-

Clarifying the Time-Sert 5600 Triple Oversized Repair: A Case of Mistaken Tap Sizes
We recently had a customer call us, that was understandably confused about a Time-Sert thread repair …11th Jun 2026 -

Polyurea vs Epoxy Garage Floor Coating: Best Resurface for Garage Floor?
Here at WiseAutoTools.com, we usually cover things like spark plug thread repair and other aluminum …26th Feb 2026 -

Stripped Chevy Starter Bolt Threads?
A recent customer reached out after installing a rebuilt engine from Jasper Engines in a Chevy. The …19th Feb 2026